


So, here it is, guys! My first 'real' pattern, as it were. I'm pretty proud of it. However, please don't hesitate to suggest improvements, especially for clarity. I have trouble explaining things, sometimes, and it'd be great to hear if other people understand this...I would actually like people to knit these, after all. ;) I've also tried to make it clear where customization of the pattern is very easy - I hate for people to feel constrained by instructions.

Note: I recommend reading through the whole pattern before knitting it to ensure understanding, both of techniques, construction, etc. and of the different options given for different parts.
Techniques:
cast on, knit, purl, use double pointed needles (dpns), cabling (c3b = bring 3 stitches to back on cable needle (cn), knit 3, knit 3 off of cn), pick up stitches, increase (knitting into loop below), bind off
Materials:
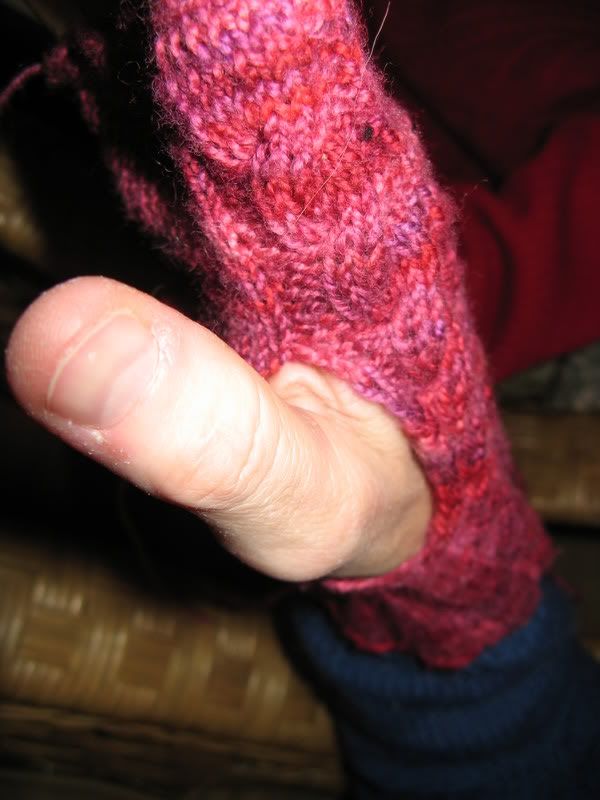
- yarn - I used Cherry Tree Hill sock yarn, but Koigu or anything of similar weight would work. Yardage depends on desired wrist length - I used one skein of the Cherry Tree Hill (420 yards, I believe) and had plenty left over. Note: In this weight yarn, the pattern will produce what would probably be a woman's small, or maybe medium - it's fairly stretchy due to the cables and ribbing. To make a larger size, either adjust the stitch count or use thicker yarn.
- dpns of appropriate size (to get a gauge that doesn't leave noticeable holes but isn't too stiff, either). US 2 worked well for me.
- cable needle (or just a spare dpn, perhaps of one size down)
- 2 stitch markers
- scrap yarn to hold stitches
- basic supplies (scissors, darning needle, etc.)
Pattern:
Wrist:

Cast on 57 stitches, dividing as follows:
on 3 needles - 15, 21, 21
on 4 needles - 15, 21, 10, 11
They should be divided this way to maintain integrity of pattern (cables, etc.). It also makes it easier to try it on while making it, because all the palm stitches are on one or two needles, and all the stitches for the back of the hand are on two needles.
Rnd 1-6: (p2, k6, p2, k3) 3 times, (p3, k3) 3 times
Rnd 7: (p2, c3b, p2, k3) 3 times, (p3, k3) 3 times
Continue in this manner for desired wrist length (roughly 50 rows to do it like in the photos).
Hand:
Stitch pattern remains the same, except: Replace the 21st of 3x3 ribbing at the end of the round with k21. While doing this:
Thumb, method 1 - Gusset:
Thumb is made in between two stitch markers, with the rest of each round continued in the established pattern. For the right glove, place the markers on either side of the first two stitches of the 'k21' at the end of the round. For the left, place on either side of the last two stitches. These rounds are what to do in-between the markers. They may or may not correspond with the rows of the cable pattern.
Rnd 1: k1, inrease by knitting the loop below, k1
Rnd 2, 3: knit
Rnd 4: k1, knit to last st before marker, increase, k1
Repeat rounds 2-4 (while continuing pattern for rest of hand for the rest of each round) until there are 9 stitches between the markers. Continue as established, knitting from marker to marker, until the glove comes up to the place where the thumb separates from the hand. Put the thumb stitches on a piece of scrap yarn, cast on 2 stitches over the gap, and continue with the general pattern, cables on the back and knitting across the palm. At the end, finish the thumb in the same manner as the other fingers.
Thumb, method 2 - Slot:
Begin working back and forth, continuing the cable pattern by replacing knits with purls and purls with knits on the wrong side. Be sure to turn and purl after an even-numbered row so that you won't have to cable from the purl side.
Once the glove comes up past the point where the thumb separates from the hand, reattach and work in the round again.
When the glove goes to slightly below the highest point of the palm, place all the stitches on a piece of scrap yarn.
Fingerlets, as it were (ending 1):
For each finger, take 4 stitches from the palm and 9 from the back of the hand. For the middle finger, take 5 from the palm. Work the pinky finger first, taking the 13 aforementioned and casting on two more across (between pinky and ring finger). Knit these for approximately 3 rows (again, a judgment call), then bind off. For the ring finger, pick up two from the pinky (where they were cast on) and cast on two between the ring and middle finger, then knit these. Continue this procedure across top of hand, and for thumb if you used method 1.
Ending 2 - ribbing:
I haven't tried this, so I don't have a picture, but I think it could also look nice, if you just can't deal with all those fingers and ends, to simply finish with changing back to 3x3 ribbing for the palm at the end of the glove instead of making the fingerlets. It would also go reasonably faster.
Here's a cool idea: On the second glove, make the cables twist the other direction. That is, cable to the front instead of the back.
Finishing:
Weave in all ends. You may want to use the (multiple!) ends around the fingerlets to close up any little holes that may be left from picking up and casting on stitches, just to neaten it up.
Wear (or gift) and enjoy!

 Only advertising what


4 comments:
I really like your mitts. I think I'm going to try your pattern so that I can use up some of my sock yarn. Thanks for the pattern!!!
Thanks! Be sure to post some pictures on Ravelry - you're on there, right?
Hey people, this is Ray-chell's friend Alethia, she gave me a pair of these and I am in love with them!!! <3 So you should all make them and testimonialize because she is just that amazing.
The end. =)
I'm so lost on the pattern after we get past the first 50 rows. Yikes.
Post a Comment